EXEMPTAX can connect with Recurly to synchronize customer and subscription information and automate tax exemption management. The integration uses Recurly API credentials and a webhook connection to allow EXEMPTAX to communicate with your Recurly account and receive updates when customer or subscription information changes.
Once configured, the integration can help streamline exemption management by synchronizing applicable customer information with EXEMPTAX and automatically updating exemption status based on the settings you select.
This guide walks you through the steps required to connect Recurly to EXEMPTAX, configure the required API and webhook settings, and complete the integration setup.
Please keep in mind that access to integration settings might be restricted for some user roles. Contact your EXEMPTAX account owner to check if you have sufficient access rights to perform this function.
To get started, follow the steps below.
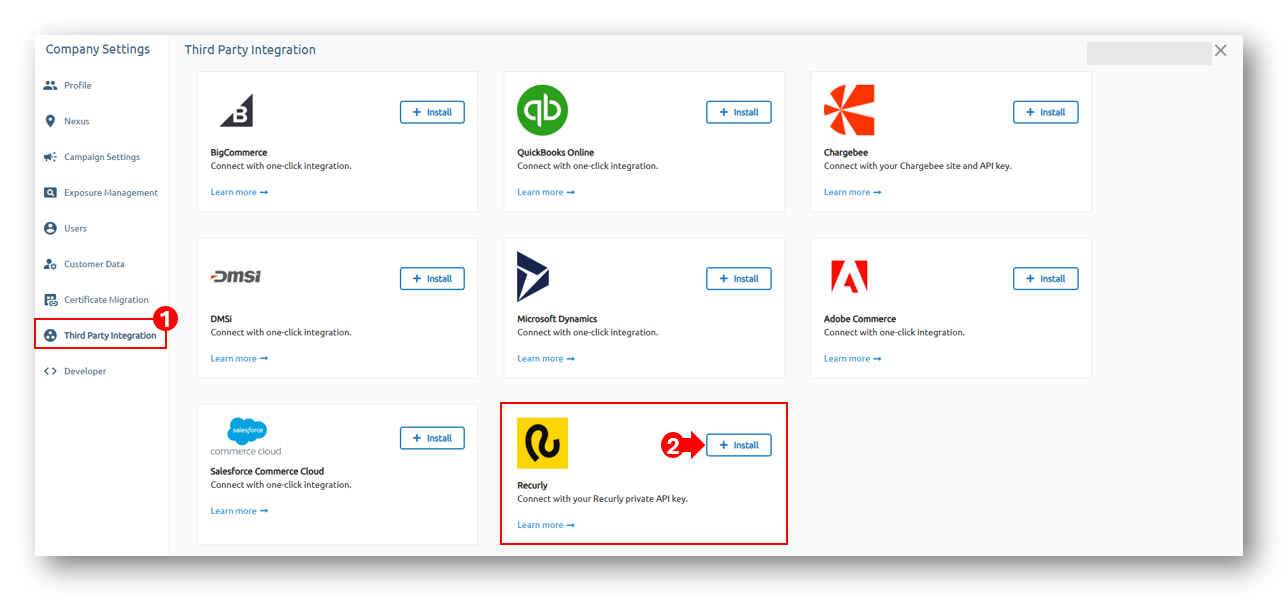
1. Start the EXEMPTAX Recurly Integration Setup. Navigate to the Recurly integration setup in EXEMPTAX by going to the Company Settings > (1) Third Party Integration > scroll down to locate the Recurly Tab and click (2) Install. The setup will provide the information you need to connect your Recurly account, including the API credentials and webhook details required for the integration.
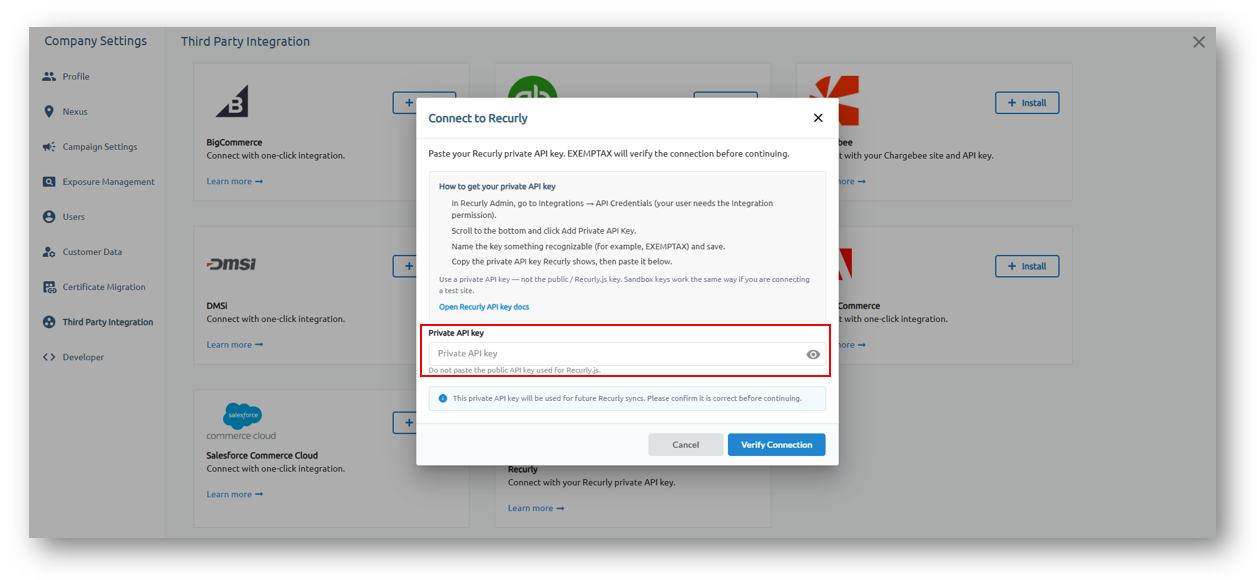
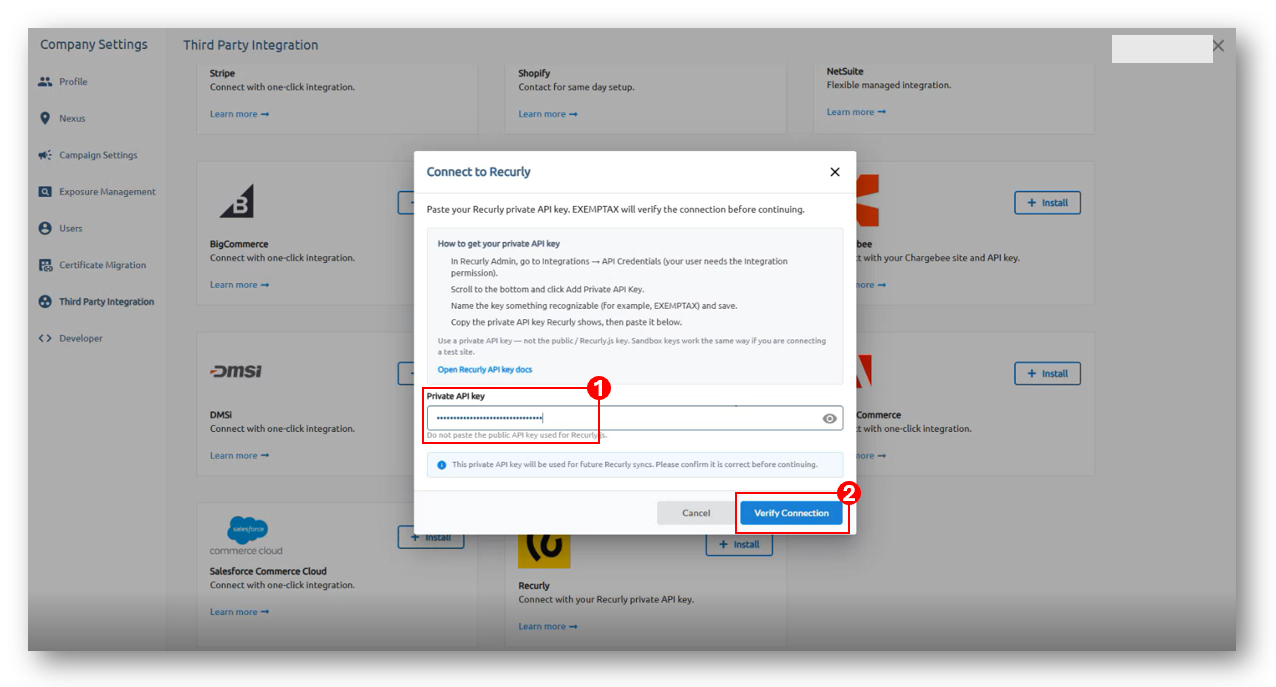
2. You will be prompt to enter a Private API Key to sync your EXEMPTAX account to Recurly.
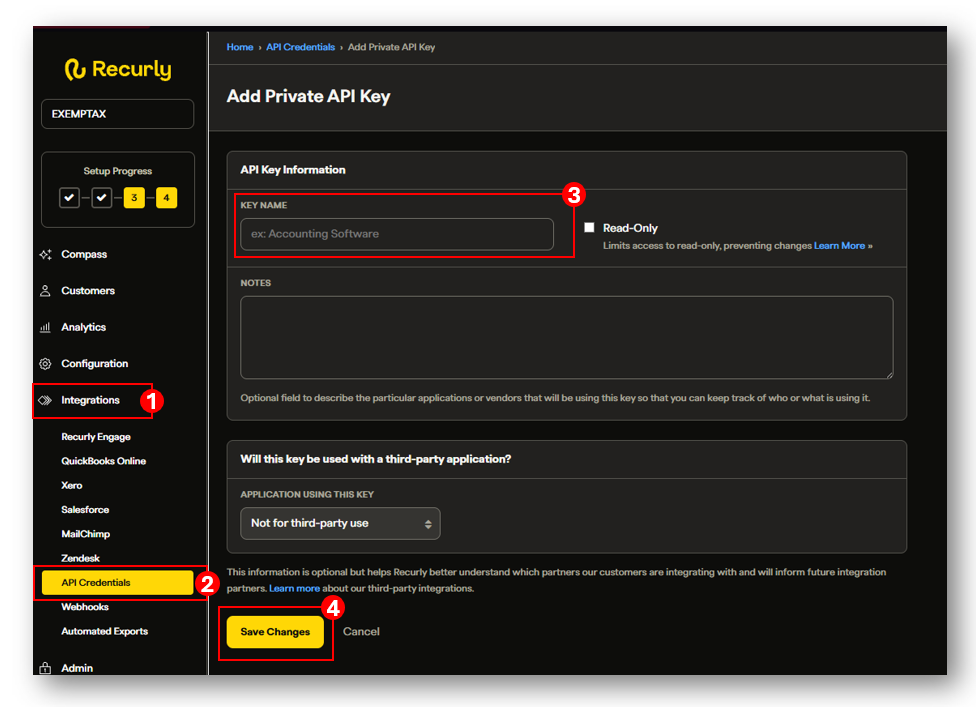
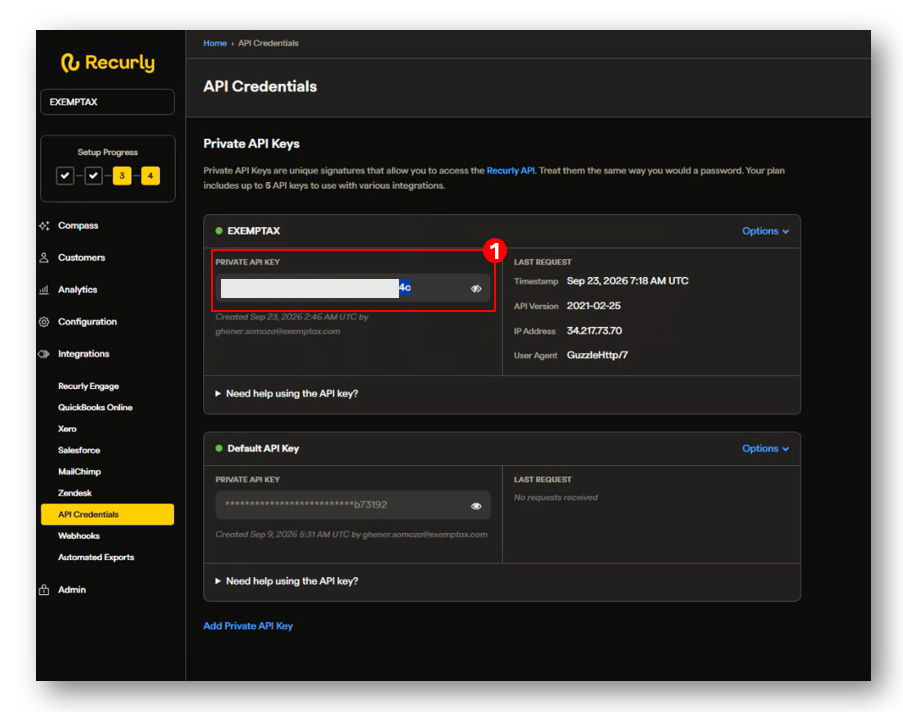
To create a Private API Key in Recurly, log in to your Recurly account and navigate to (1) Integrations > (2) API Credentials. Create a new Private API Key for the EXEMPTAX integration. Enter EXEMPTAX in the (3) Key Name field to make the key easy to identify, then click (4) Save Changes to create the new Private API Key.
3. After saving the new Private API Key, copy the (1) API key and keep it available for the EXEMPTAX setup. The API key allows EXEMPTAX to communicate with your Recurly account through the Recurly API.
4. Return to the EXEMPTAX Recurly integration setup and enter the (1) Private API Key you copied from Recurly into the appropriate API credential field. Review the information you entered and click (2) Verify Connection to test the connection between EXEMPTAX and Recurly.
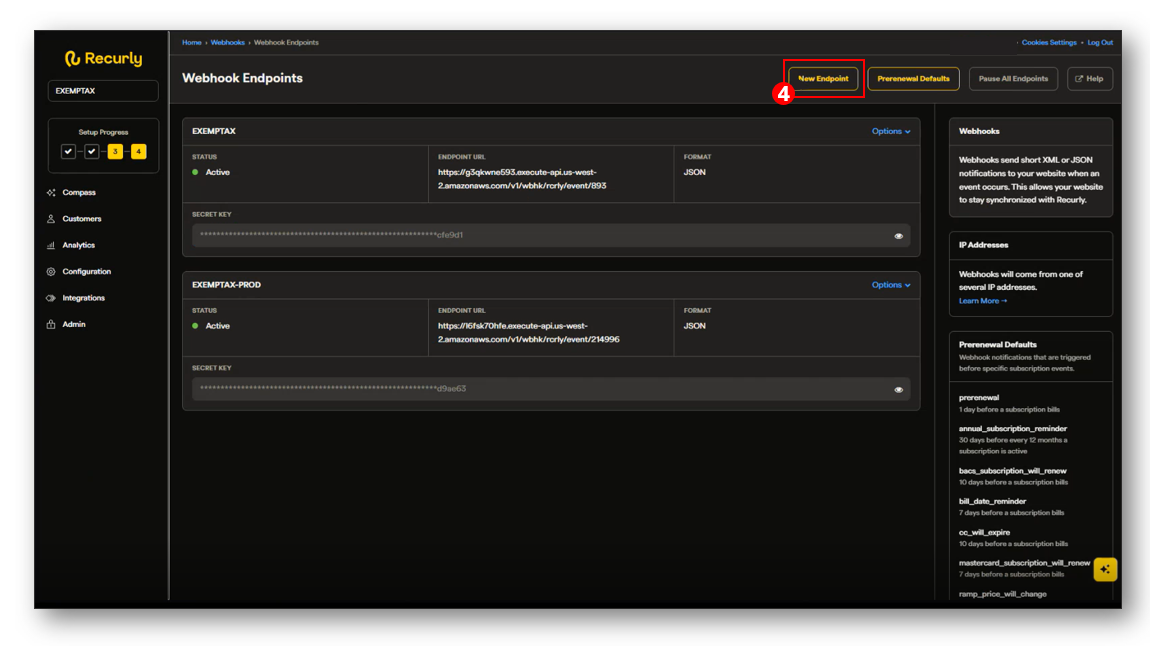
5. After verifying the API connection, configure a webhook in Recurly so EXEMPTAX can receive updates when customer or subscription information changes. In Recurly, navigate to (1) Integrations > (2) Webhooks > (3) Manage Endpoints and click New Endpoint.
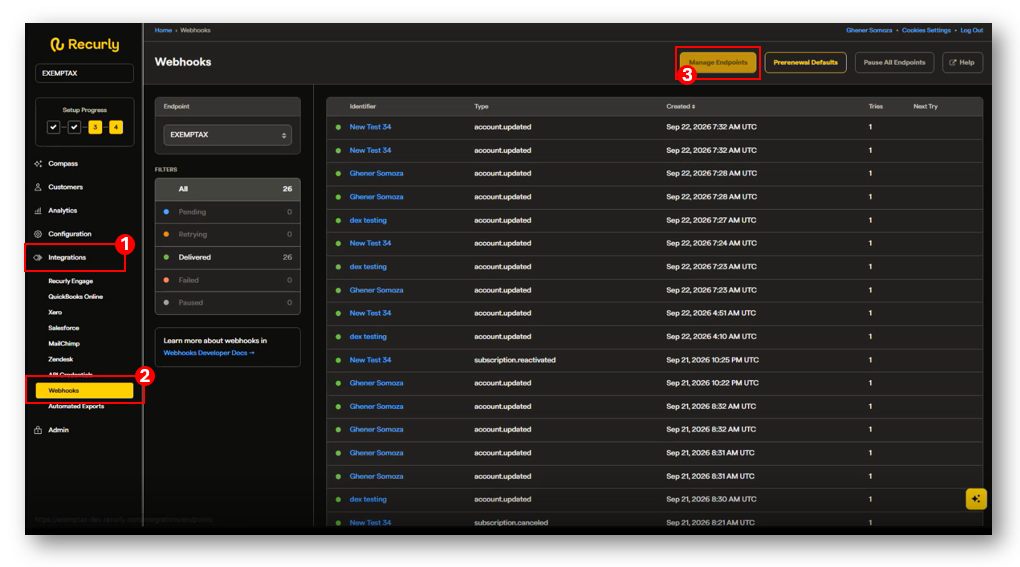
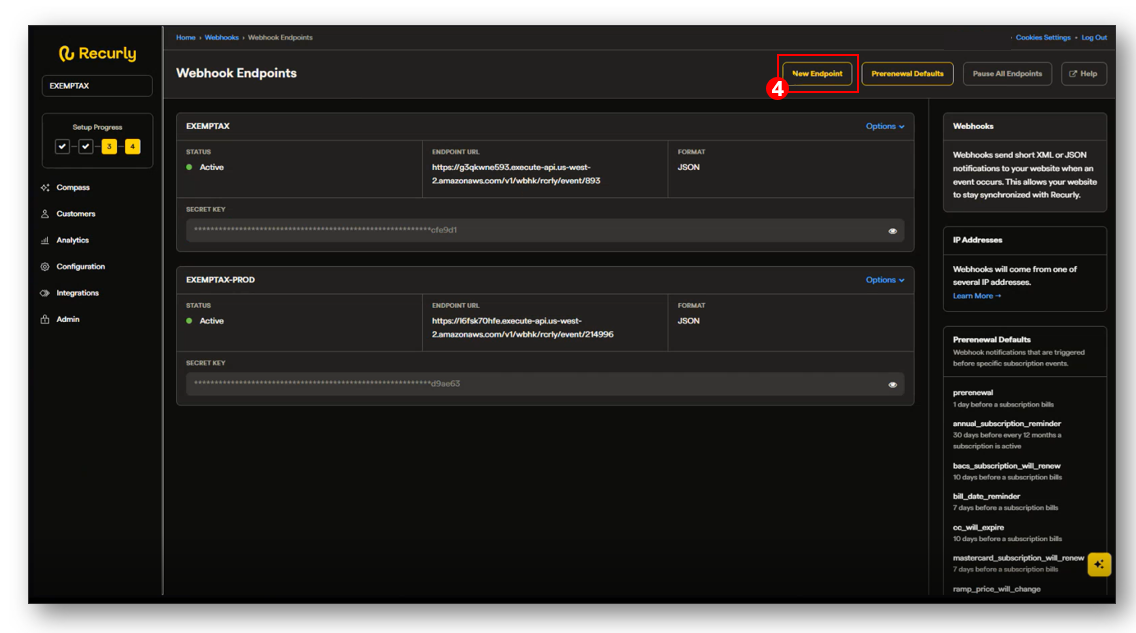
6. Enter the Webhook Endpoint Information. Configure the new webhook endpoint using the information provided in the EXEMPTAX Recurly integration setup. To do this, navigate to Recurly > (1) Integrations > (2) Webhooks > (3) Manage Endpoints > (4) New Endpoint.
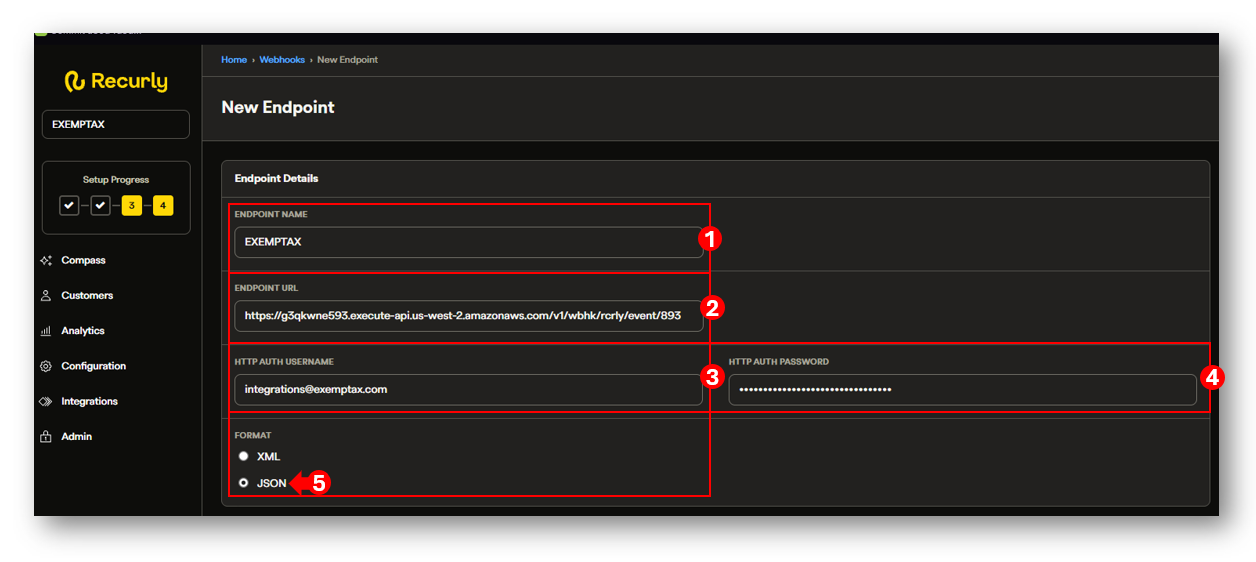
For the endpoint: enter EXEMPTAX as the (1) endpoint name, or another name that makes the endpoint easy to identify. Copy the Webhook URL provided by EXEMPTAX and paste it into the (2) Endpoint URL field. Enter integration@exemptax.com as the (3) HTTP authorization username. Copy the authorization password provided by EXEMPTAX and enter it in the (4) password field. Select (5) JSON as the webhook format.
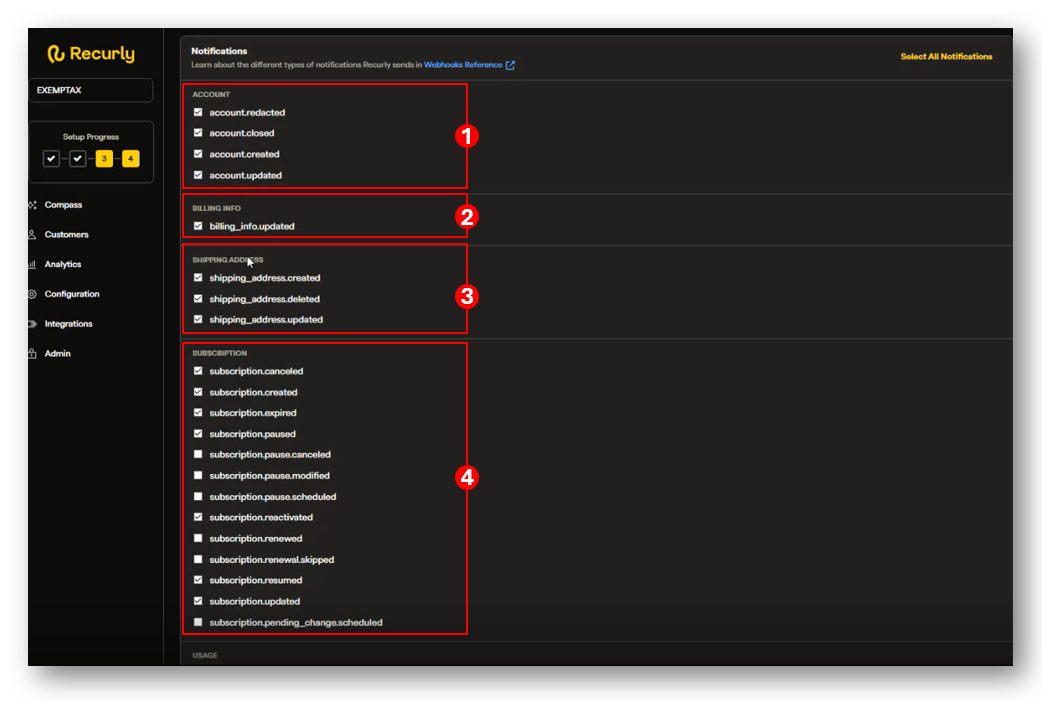
7. Configure the webhook to send the information required by EXEMPTAX. Select the applicable notifications from the following options:
For Account, you can select the following events:
A. Redacted
B. Closed
C. Created
D. Updated
For Billing Info, you can only select the Updated event.
For Shipping Address, you can select the following events:
A. Shipping Address Created
B. Shipping Address Deleted
C. Shipping Address Updated
For Subscription, select the following events:
A. Created
B. Updated
C. Cancelled
D. Expired
E. Reactivated
F. Resumed
G. Paused
If you select additional subscription notifications or choose to send all available notifications, EXEMPTAX will only process the supported subscription events listed above.
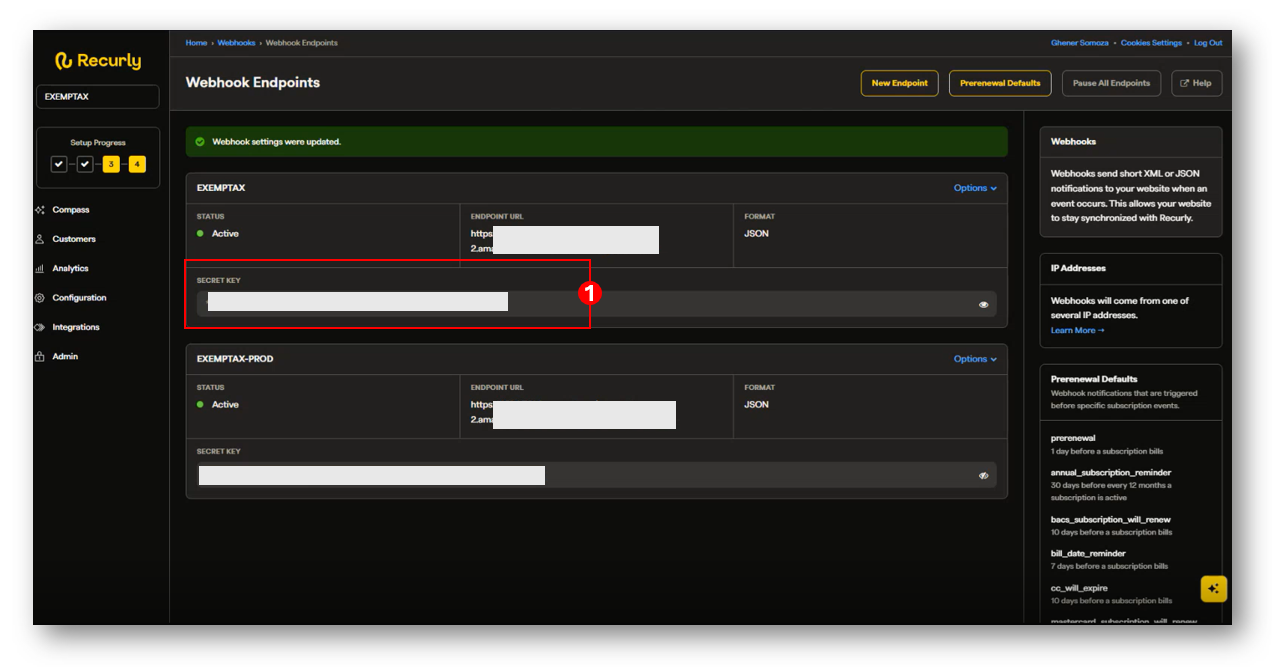
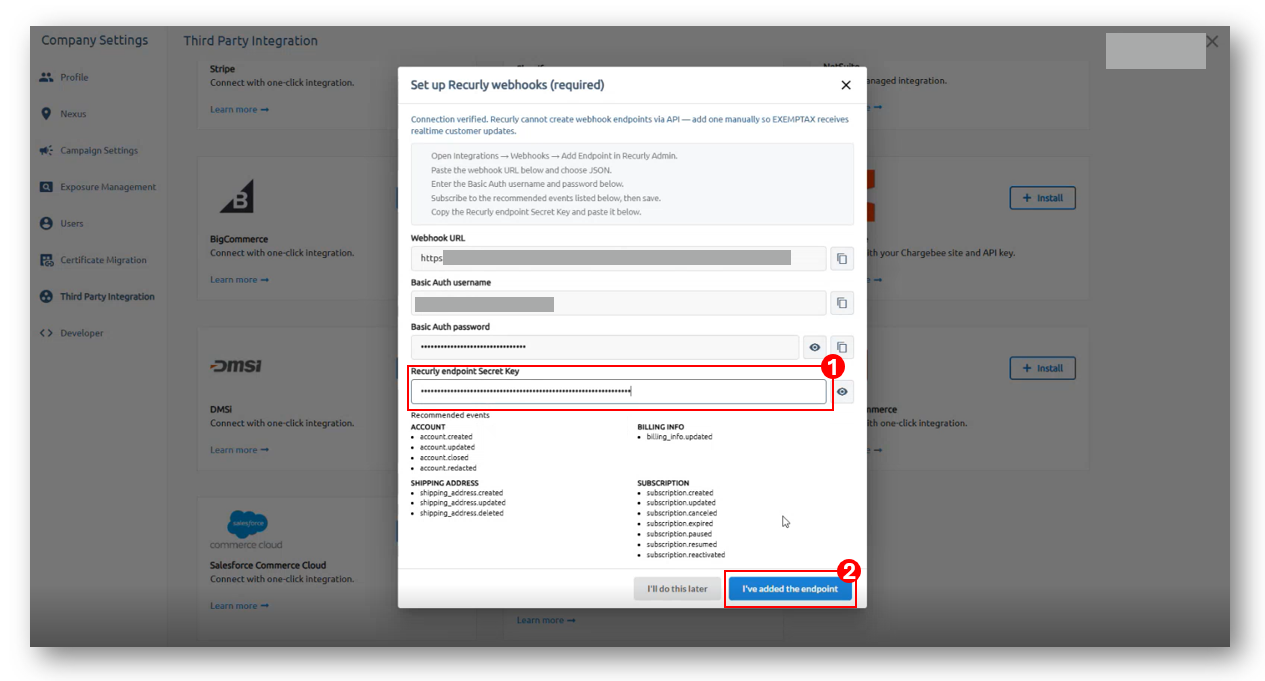
8. Save the new webhook endpoint in Recurly. After the endpoint has been created, copy the (1) Secret Key provided by Recurly and return to the EXEMPTAX integration setup.
Enter the (1) Secret Key in the corresponding field in EXEMPTAX. This key is used to validate the webhook connection and help ensure that webhook notifications received by EXEMPTAX are coming from a secure connection. Once done, click (2) I've added the endpoint, to proceed.
9. After configuring the Webhooks settings, you will then be asked to set up your EXEMPTAX Recurly Integration.
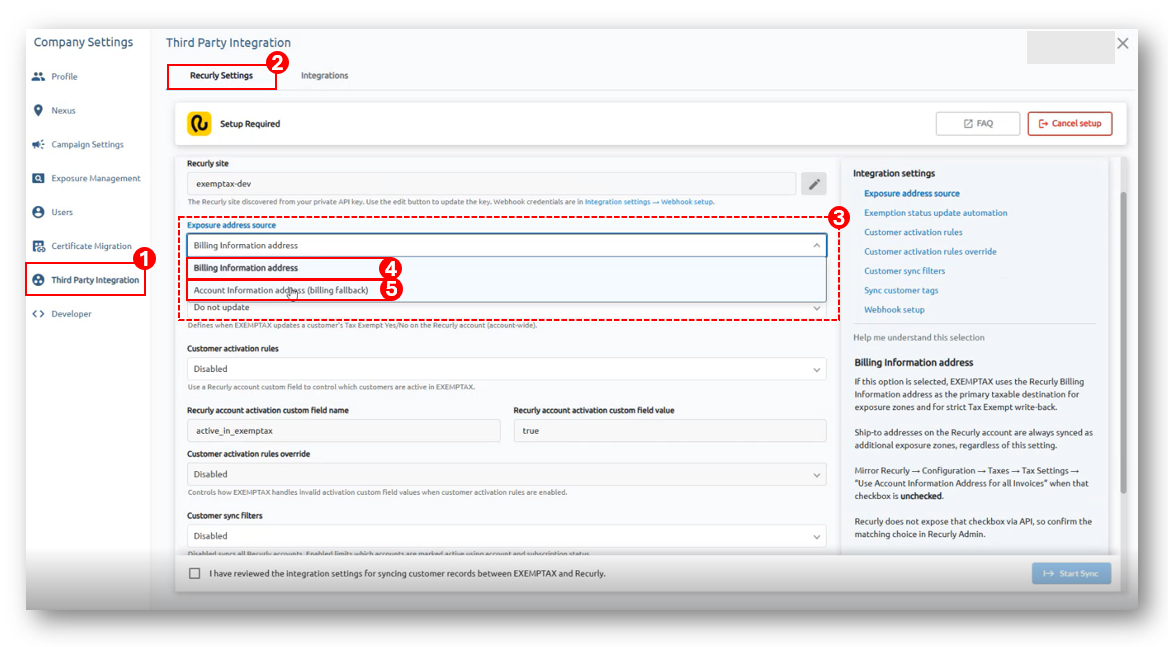
To do this, navigate to Company Settings > (1) Third Party Integrations > (2) Recurly Settings in EXEMPTAX.
The following settings need to be configured to complete the integration:
A. (3) Exposure Address Source - Choose which Recurly address EXEMPTAX should use as the primary taxable destination for exposure zones and tax calculation. Ship to addresses are always synchronized as additional exposure zones.
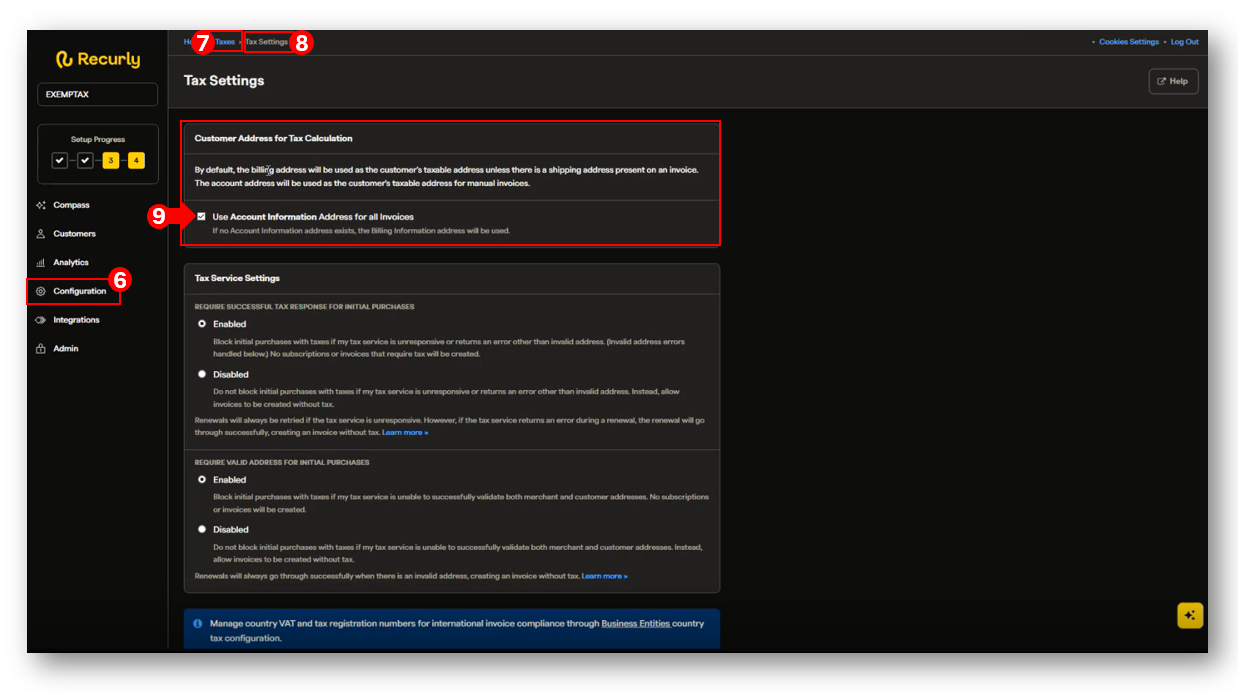
a. (4) Billing Information address - If this option is selected, EXEMPTAX uses the Recurly Billing Information address as the primary taxable destination for exposure zones and for strict Tax Exempt write back. Ship to addresses on the Recurly account are always synchronized as additional exposure zones, regardless of this setting. This setting should mirror Recurly > Configuration > Taxes > Tax Settings > Use Account Information Address for all Invoices when the checkbox is unchecked. Recurly does not expose this checkbox through the API, so confirm that the matching option is selected in Recurly Admin.
b. (5) Account Information address (billing fallback) Recommended - If this option is selected, EXEMPTAX uses the Recurly Account Information address as the primary taxable destination. If an Account Information address is not available, EXEMPTAX falls back to the customer's Billing Information address. Ship to addresses on the Recurly account are always synchronized as additional exposure zones, regardless of this setting. This setting should mirror Recurly > (6) Configuration > (7) Taxes > (8) Tax Settings > (9) Use Account Information Address for all Invoices when the checkbox is checked. Recurly does not expose this checkbox through the API, so confirm that the matching option is selected in Recurly Admin.
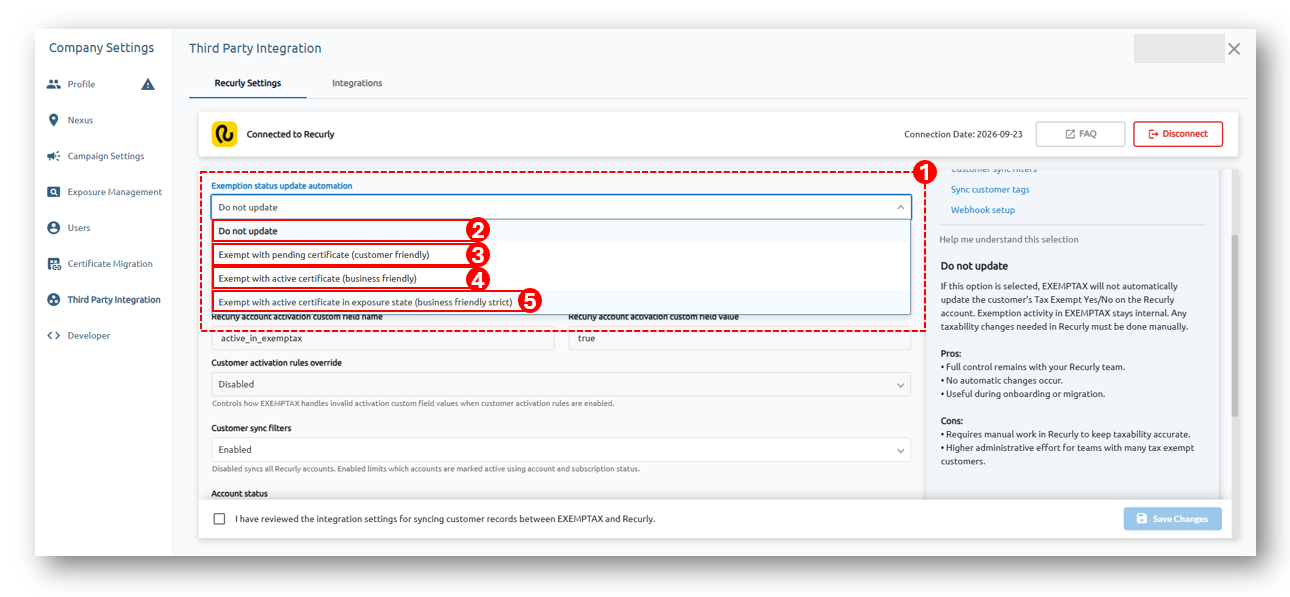
B. Exemption Status Update Automation - Select how EXEMPTAX should determine when a Recurly customer is considered tax exempt based on the exemption information available in EXEMPTAX. The integration uses the standard (1) Exemption Status Update Automation settings.
a. (2) Do not update - If this option is selected, EXEMPTAX will not automatically update the customer's Tax Exempt Yes/No status on the Recurly account. Exemption activity in EXEMPTAX stays internal, and any taxability changes needed in Recurly must be made manually.
b. (3) Exempt with pending certificate (customer friendly) - If this option is selected, EXEMPTAX marks the whole Recurly account Tax Exempt = Yes as soon as the customer has a pending certificate in EXEMPTAX, even before review or approval.
c. (4) Exempt with active certificate (business friendly) - If this option is selected, the Recurly account becomes Tax Exempt = Yes only after at least one exemption certificate for that customer has been approved in EXEMPTAX. The state on the certificate does not matter.
d. (5) Exempt with active certificate in exposure state (business friendly strict) Recommended - If this option is selected, EXEMPTAX sets Recurly Tax Exempt = Yes only when every exposure zone is covered by an active approved certificate. Exposure zones include the primary address selected under Exposure Address Source, either Billing Information or Account Information, plus all Recurly ship to addresses. If any exposure zone is missing coverage, the account remains Tax Exempt = No.
Important: Recurly uses an account wide Tax Exempt Yes/No status. A customer may have multiple shipping addresses in Recurly, and those addresses can be synchronized with EXEMPTAX. The selected Exemption Status Update Automation setting determines how EXEMPTAX evaluates the customer's exemption information and updates the Recurly account.
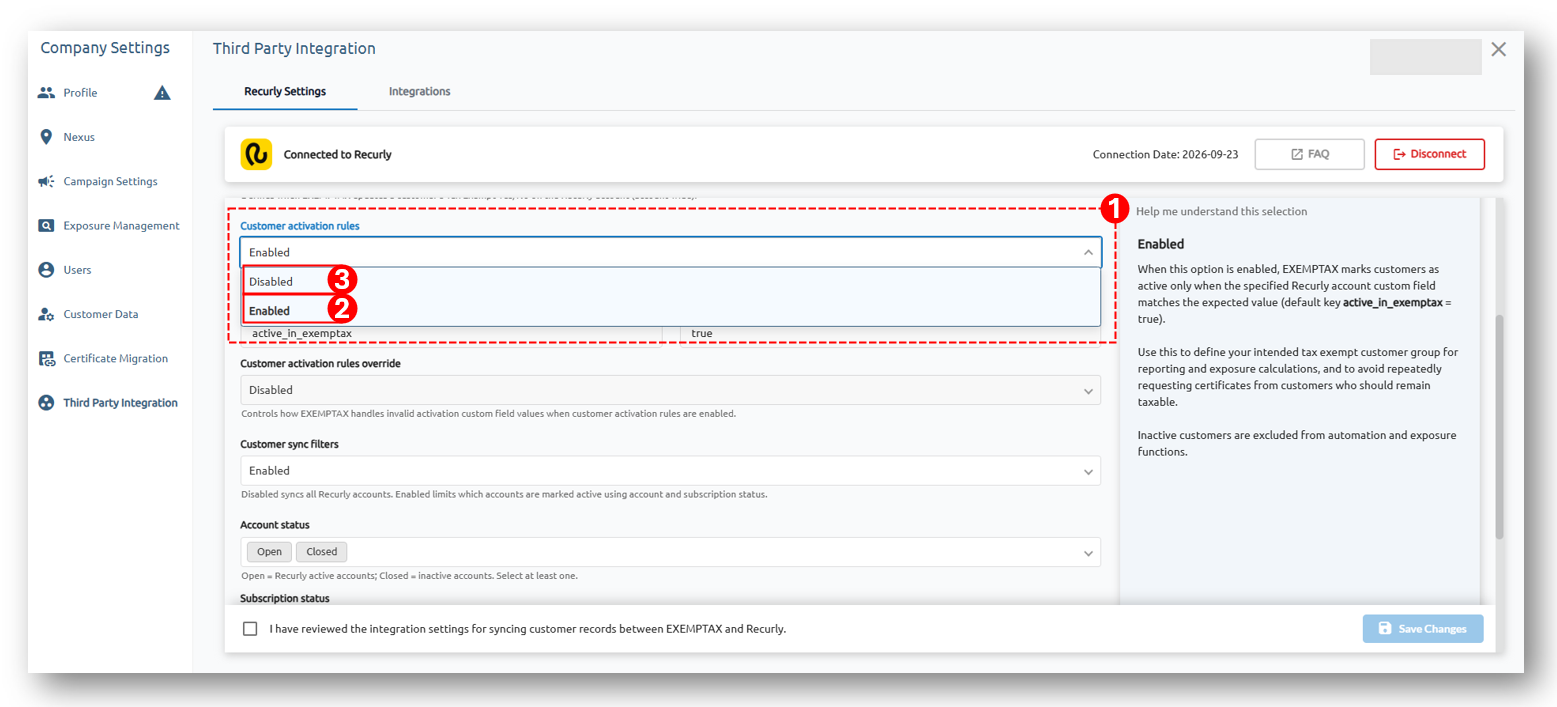
C. (1) Customer Activation Rules - Use the Customer Activation Rules setting to determine whether synchronized Recurly customers should be active or inactive in EXEMPTAX.
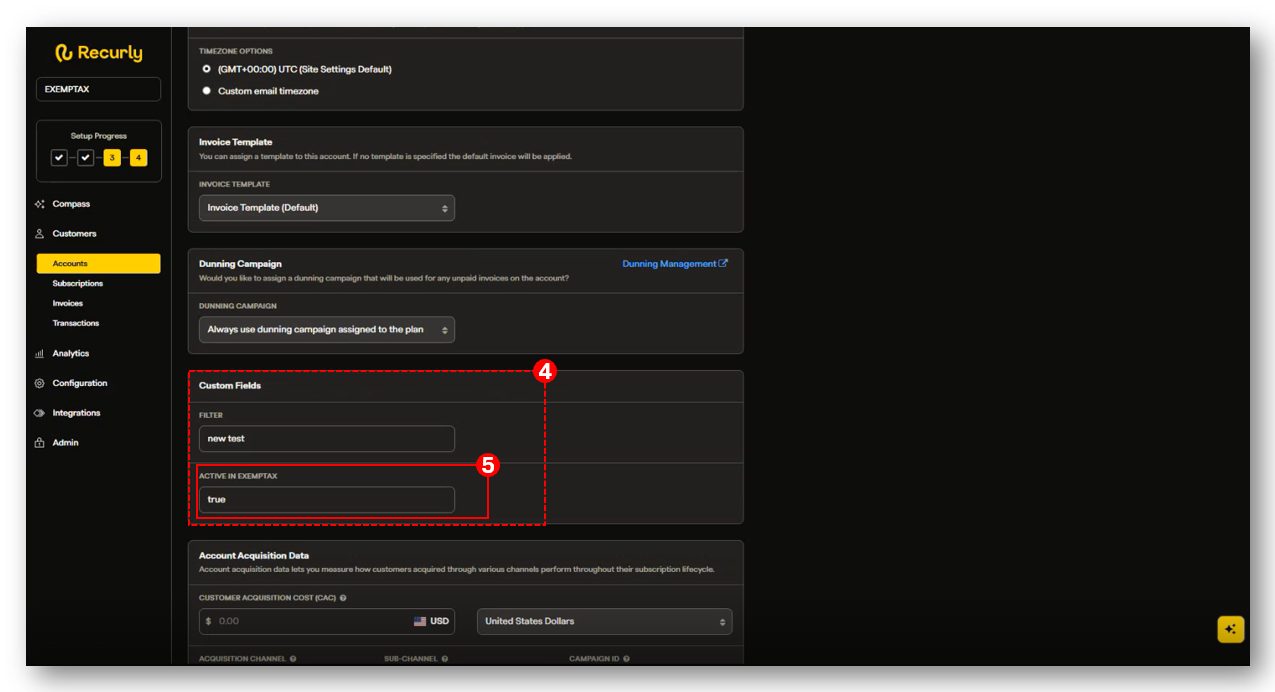
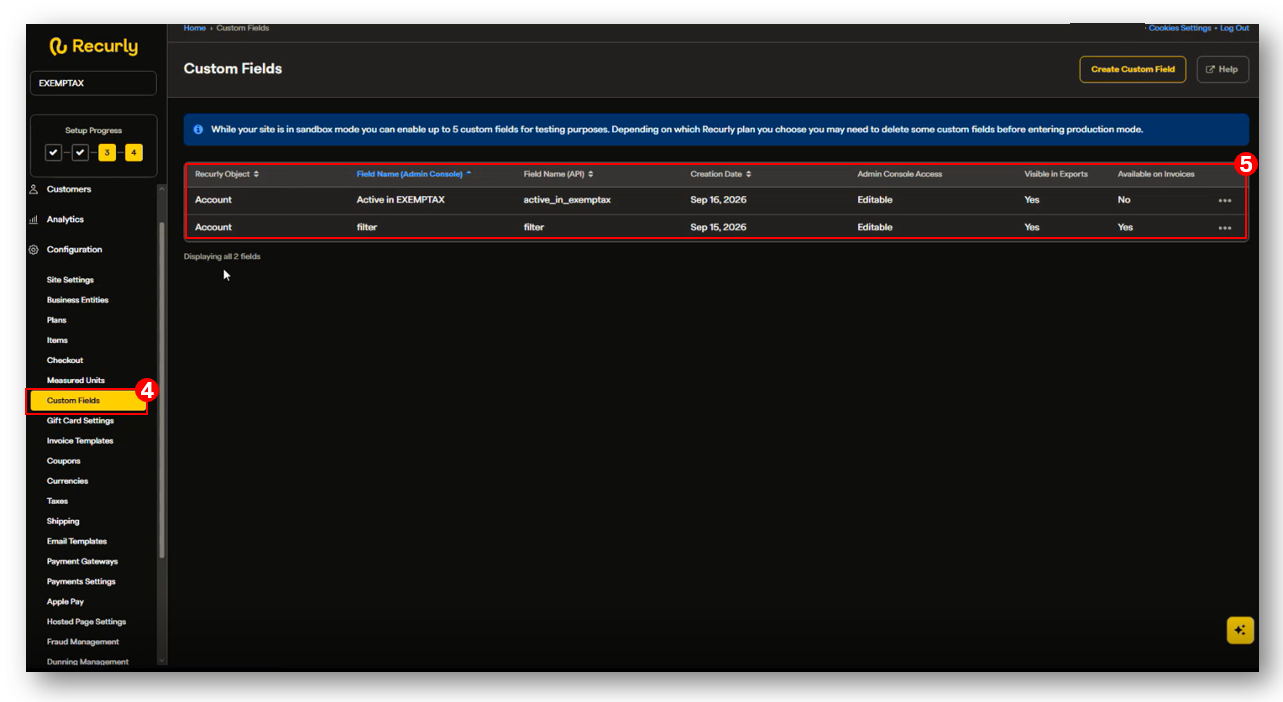
When this option is (2) enabled, EXEMPTAX marks customers as active only when the specified Recurly account (4) custom field matches the expected value. The default key is active_in_exemptax = true. For example, the setup can use an (5) Active in EXEMPTAX custom field. You can use an existing custom field or configure the appropriate custom field in Recurly before completing the integration setup. Use this setting to define the intended customer group for reporting and exposure calculations and to avoid repeatedly requesting certificates from customers who should remain taxable. Inactive customers are excluded from automation and exposure functions.
When this option is (3) disabled, which is the default, EXEMPTAX marks Recurly customers as active based on standard sync rules, such as US exposure eligibility, without requiring a custom field.
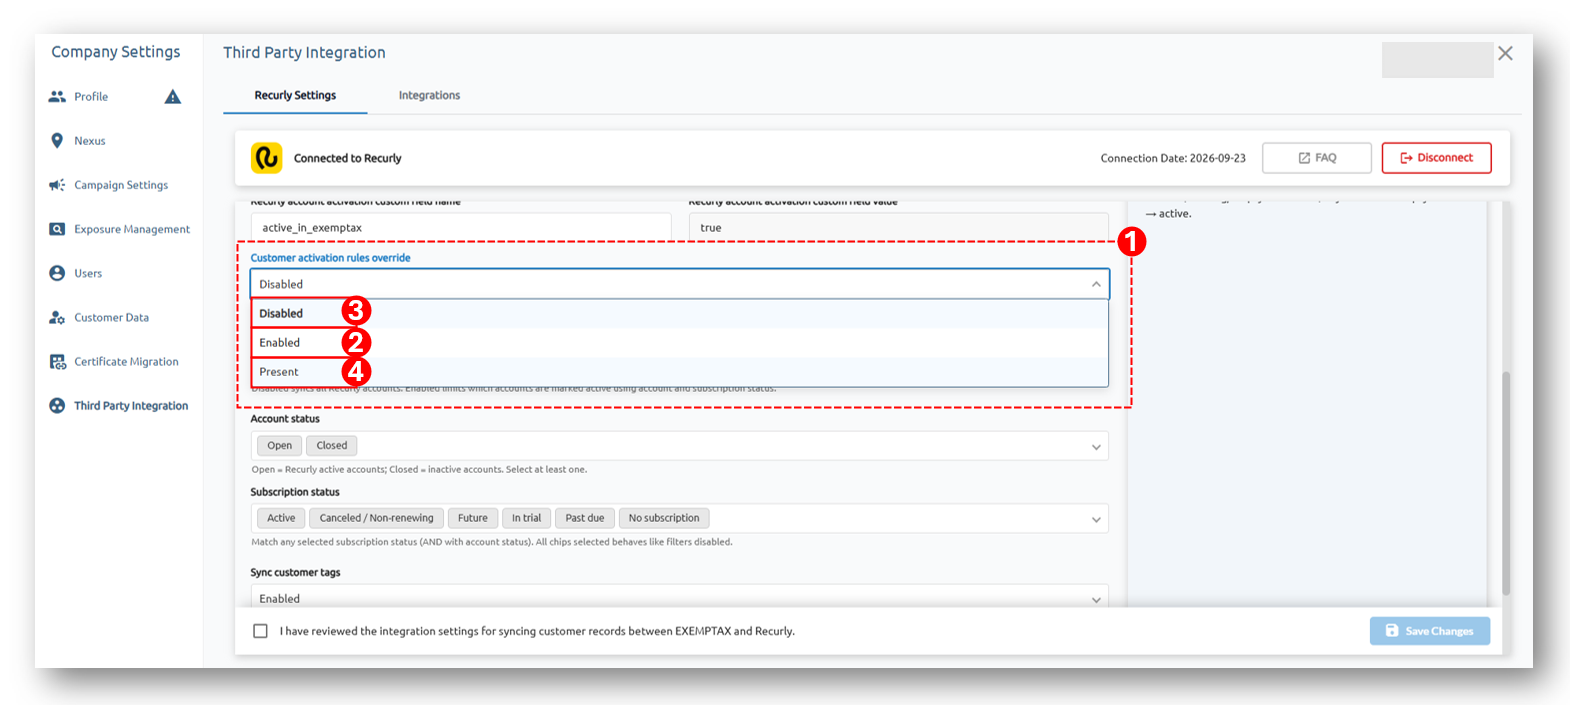
D. Customer Activation Rules Override - Use Customer Activation Rules Override to control how EXEMPTAX handles invalid or unexpected values in the activation custom field when Customer Activation Rules are enabled.
a. When Disabled - EXEMPTAX determines active status from the activation custom field as follows: true means active, false means inactive, Missing or empty means inactive and any other non empty value means active.
b. When Enabled - true means active, false means inactive, if the value is empty or anything other than true or false, the customer is treated as active.
c. When set to Present - Any value in the activation custom field marks the customer as active, if the field is empty, the customer is inactive.
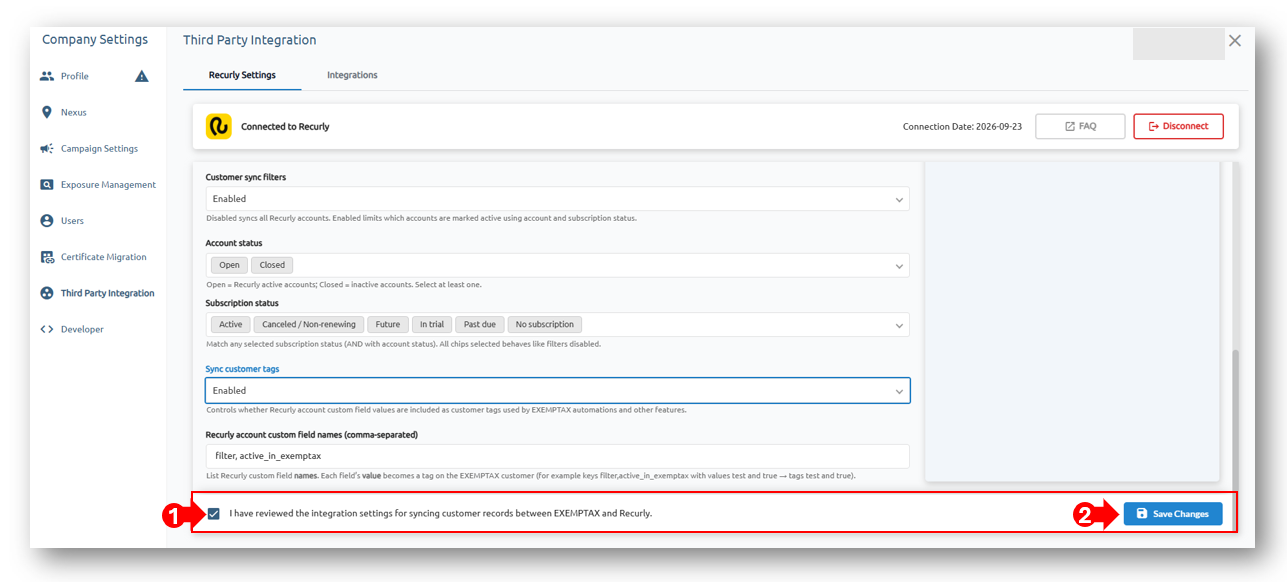
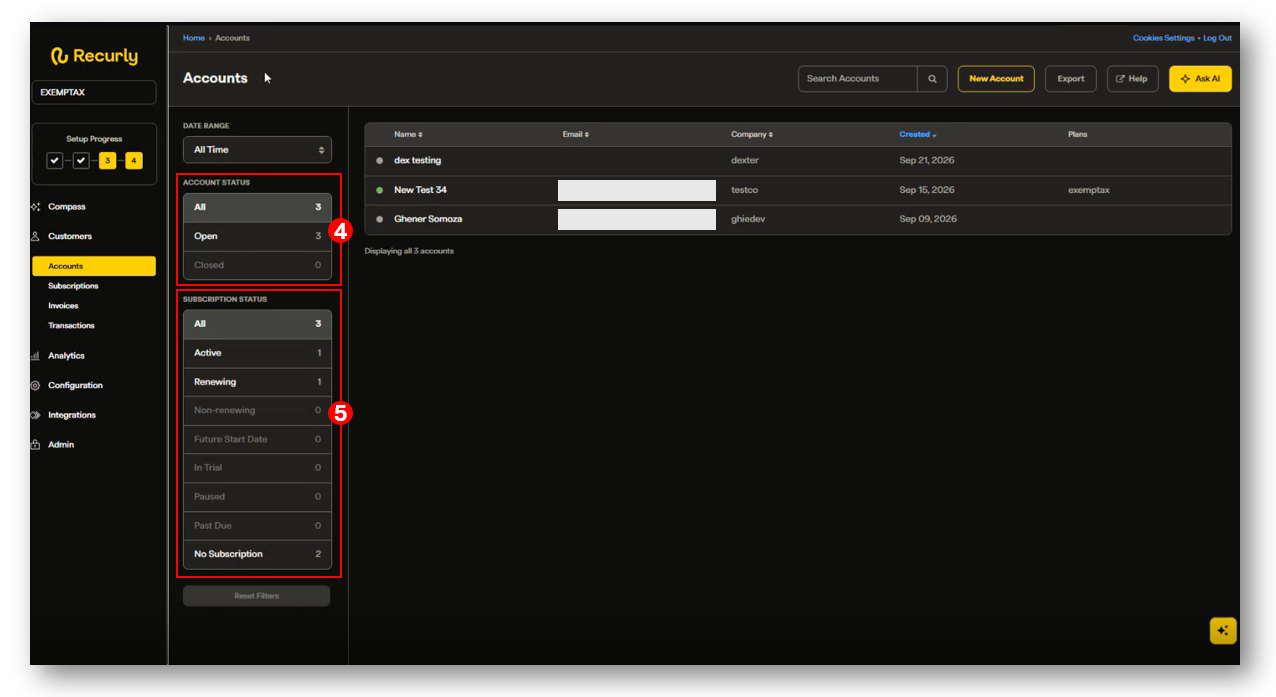
E. (1) Customer Sync Filters - Use the Customer Sync Filters setting to control which Recurly customers are synchronized with EXEMPTAX based on their account and subscription status. When (2) enabled, EXEMPTAX marks customers as active only when they match the selected filters.
Under (4) Account status (AND), you can select:
a. Open
b. Closed
Under (5) Subscription status (any selected), you can select:
a. Active
b. Canceled / Non renewing
c. Future
d. In trial
e. Past due
f. No subscription
Select the account and subscription statuses that should be included in the synchronization.
For example, if the filter is configured for active customers, EXEMPTAX will synchronize customers that meet the selected account or subscription status criteria and are marked as active based on the Customer Activation Rules.
If all options are selected, the filters behave the same as if filtering were disabled because no customers are excluded. Deselect any options that you do not want synchronized as active.
Filtering uses flags already returned in Recurly account list responses, so sync speed stays the same as a full sync in typical configurations.
When (3) disabled, which is the default, EXEMPTAX syncs all Recurly accounts without account or subscription status filters. This is the fastest path and matches a full site sync. The Account status and Subscription status controls remain hidden while filters are disabled.
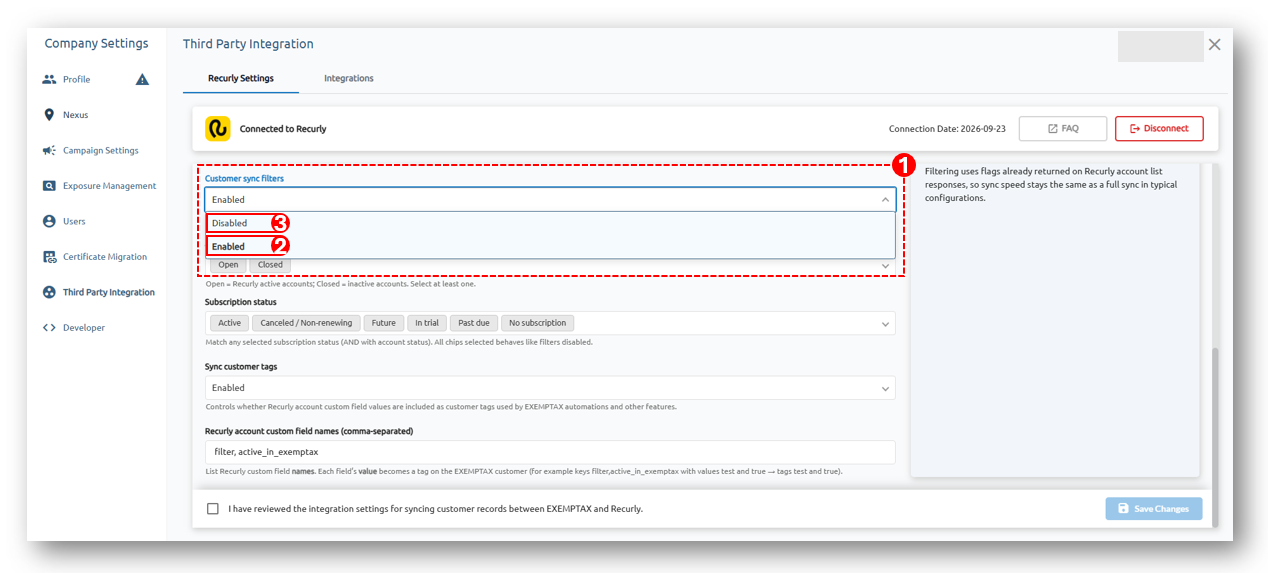
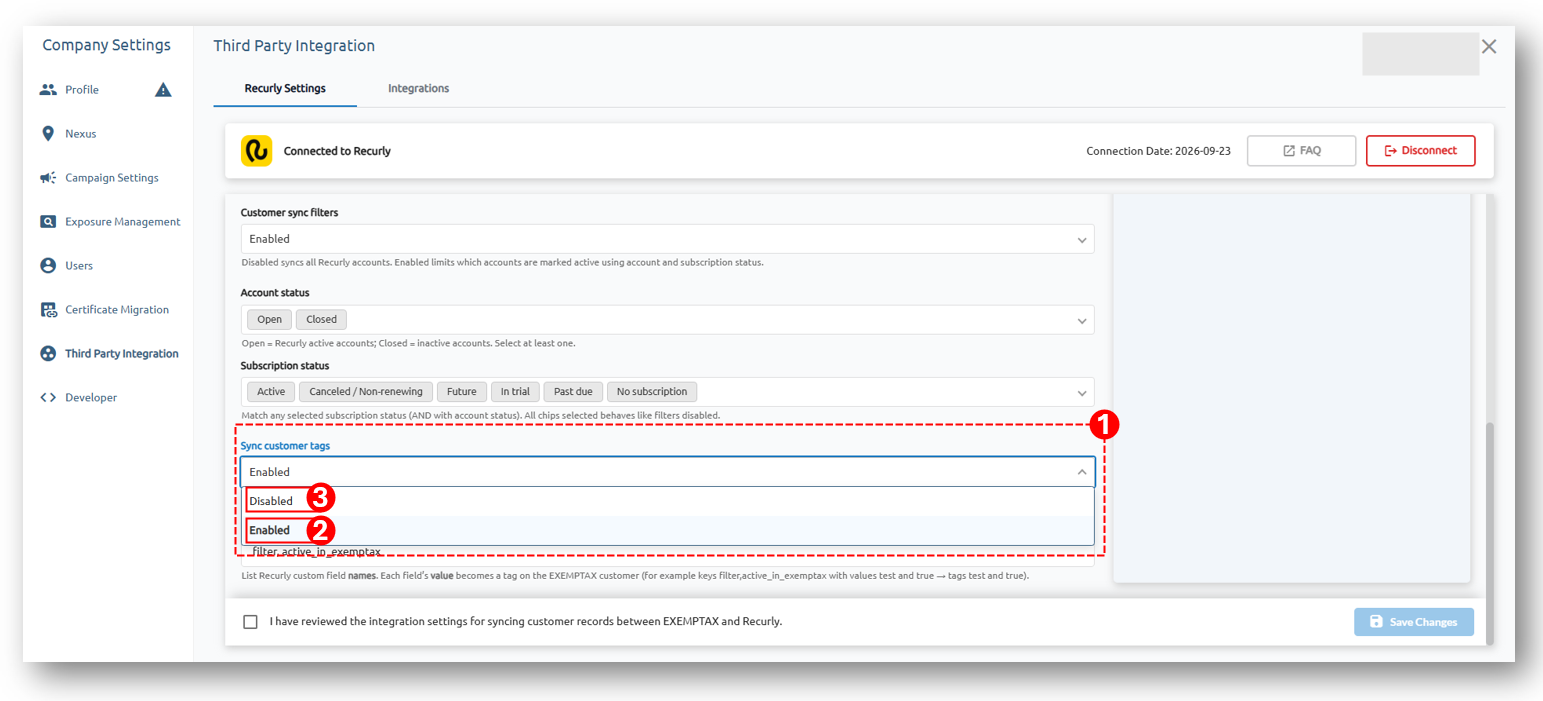
F. (1) Sync Customer Tags - Use Sync Customer Tags if you want Recurly account custom field values to be synchronized as customer tags in EXEMPTAX.
When this option is (2) enabled, EXEMPTAX reads the (4) Recurly account custom fields specified in the Tag Keys setting and uses each field's value as a customer tag. Enter the appropriate (5) custom field key or keys used for your customer tags. If multiple keys are used, enter them as a comma separated list. For example, if the keys are filter, active_in_exemptax and the corresponding values are test and true, EXEMPTAX creates the customer tags test and true. Once synchronized, these tags can be used in EXEMPTAX to help identify and filter groups of customers, including when creating targeted exemption certificate campaigns.
When this option is (3) disabled, Recurly account (4) custom field values are not passed to EXEMPTAX as customer tags for selective exclusion logic, targeted exemption certificate campaigns, or granular targeting features.
10. Before starting the synchronization, review the integration settings to make sure they reflect how you want customer and subscription information to be synchronized between Recurly and EXEMPTAX.
Review the following:
a. API connection
b. Webhook configuration
c. Exposure Address Source
d. Exemption Status Update Automation
e. Customer Activation Rules
f. Customer Activation Rules Override
g. Customer Sync Filters
h. Sync Customer Tags
11. Once your configuration is complete, select the (1) checkbox to confirm that the integration settings have been reviewed, then click (2) Save Changes to proceed with the sync. EXEMPTAX will begin synchronizing the applicable Recurly customer and subscription information based on the integration settings you configured.